Configuring and Securing Apache Tomcat Server

Apache Tomcat (formerly also Jakarta Tomcat) is an open source web server and servlet container developed by the Apache Software Foundation (ASF). Tomcat implements the Java Servlet and the JavaServer Pages (JSP) specifications from Sun Microsystems, and provides a “pure Java” HTTP web server environment for Java code to run in.
Tomcat is the result of an open collaboration of developers and is available from the Apache Web site in both binary and source versions. Tomcat can be used as either a standalone product with its own internal Web server or together with other Web servers, including Apache, Netscape Enterprise Server, Microsoft Internet Information Server (IIS), and Microsoft Personal Web Server. Tomcat requires a Java Runtime Enterprise Environment
Tomcat is the result of an open collaboration of developers and is available from the Apache Web site in both binary and source versions. Tomcat can be used as either a standalone product with its own internal Web server or together with other Web servers, including Apache, Netscape Enterprise Server, Microsoft Internet Information Server (IIS), and Microsoft Personal Web Server. Tomcat requires a Java Runtime Enterprise Environment
Working:
Web server (apache) process web client (web browsers) requests and forwards it to servlet container (tomcat) and container process the requests and sends response which gets forwarded by web server to the web client (browser).

Installation:
First check JAVA is installed or not in your system, JAVA is the first requirement of Apache Tomcat installation. Use following command to check if you have java installed or not.
#java -version
#java -version
If not download latest version of java from here
If you are using terminal (Command Mode)
#chmod 755 /opt
#cd /opt/
#cd /opt/
Extract downloaded archive using following command.
#tar -xvzf jdk-7u51-linux-x864.tar.gz
#chmod 750 jdk1.7.0_51
#cd jdk1.7.0_51
#chmod 750 jdk1.7.0_51
#cd jdk1.7.0_51
Install JAVA using Alternatives:
After extracting java archive file, we just need to setup to use newer version of java using alternatives. Use the following commands to do it.
#alternatives –install /usr/bin/java java /opt/jdk1.7.0_51/bin/java 2
#alternatives –config java
type selection number: 3

Now you have successfully configured java in your system. Go to next step to check current installed version.
Now check Version of JAVA .
#java -version
Setup Environment Variables:
Most of java based application uses environment variables to work. Use following commands to setup it.
Most of java based application uses environment variables to work. Use following commands to setup it.
#export JAVA_HOME=/opt/jdk1.7.0_51
#export JRE_HOME=/opt/jdk1.7.0_51/jre
#export PATH=$PATH:/opt/jdk1.7.0_51/bin:/opt/jdk1.7.0_51/jre/bin

Installing Apache:
Download & Extract Apache Tomcat
Download & Extract Apache Tomcat
You can download the latest Version of Apache tomcat from this Linkhttp://tomcat.apache.org/download-80.cgi#8.0.0-RC1.
Installing Tomcat from a binary release (tar file) requires manual creation of the Tomcat user account. This is not necessary if you install the Tomcat RPM package on a Linux system that supports RPMs.
For security reasons I created a user account with no login shell for running the Tomcat server:
# groupadd tomcat
# useradd -g tomcat -s /usr/sbin/nologin -m -d /home/tomcat tomcat
(It should be noted that other Linux systems have nologin under /sbin not /usr/sbin)
# useradd -g tomcat -s /usr/sbin/nologin -m -d /home/tomcat tomcat
(It should be noted that other Linux systems have nologin under /sbin not /usr/sbin)
In Command Prompt use these commands , Download & Install Apache tomcat.
#cd /opt/
#wget http://mirrors.gigenet.com/apache/tomcat/tomcat-8/v8.0.0-RC10/bin/apache-tomcat-8.0.0-RC10.tar.gz
After competed download, extract the archive file in /opt directory. You may change this location as per your setup.
#tar -xvzf apache-tomcat-8.0.0-RC10.tar.gz
#chown -R tomcat.tomcat /opt/apache-tomcat-8.0.0-RC10
#cd /opt/apache-tomcat-8.0.0-RC10
For security reasons I don’t run the Tomcat server as user root but as tomcat which was created with no login shell. Therefore, to run Tomcat use the su command with the -p option to preserves all the environment variables when switching to tomcat (more on the Tomcat environment variables later). And since the tomcat account has no login shell, it needs to be specified with the -s option.
# su -p -s /bin/sh tomcat bin/startup.sh
Tomcat can be run as a daemon using the jsvc tool from the commons-daemon project. Source tarballs for jsvc are included with the Tomcat binaries, and need to be compiled. Building jsvc requires a C ANSI compiler (such as GCC), GNU Autoconf, and a JDK.

#cd /opt/apache-tomcat-8.0.0-RC10/bin
#tar xzf commons-daemon-native.tar.gz
#cd commons-daemon-1.0.15-native-src
#cd unix
#tar xzf commons-daemon-native.tar.gz
#cd commons-daemon-1.0.15-native-src
#cd unix
Before running the script, the JAVA_HOME environment variable should be set to the base path of the JDK.
#./configure
#make
#cp jsvc ../..
#cd ../..
#cd /opt/apache-tomcat-8.0.0-RC10
#make
#cp jsvc ../..
#cd ../..
#cd /opt/apache-tomcat-8.0.0-RC10
Tomcat can then be run as a daemon using the following commands.
#CATALINA_BASE=$CATALINA_HOME
#./bin/jsvc \
-classpath $CATALINA_HOME/bin/bootstrap.jar:$CATALINA_HOME/bin/tomcat-juli.jar \
-outfile $CATALINA_BASE/logs/catalina.out \
-errfile $CATALINA_BASE/logs/catalina.err \
-Dcatalina.home=$CATALINA_HOME \
-Dcatalina.base=$CATALINA_BASE \
-Djava.util.logging.manager=org.apache.juli.ClassLoaderLogManager \
-Djava.util.logging.config.file=$CATALINA_BASE/conf/logging.properties \
org.apache.catalina.startup.Bootstrap

The file $CATALINA_HOME/bin/daemon.sh can be used as a template for starting Tomcat automatically at boot time from /etc/init.d with jsvc.
#cp /opt/apache-tomcat-8.0.0-RC10/bin/daemon.sh /etc/init.d/tomcat
#chmod +x /etc/init.d/tomcat
#chmod 755 /etc/init.d/tomcat
#chown root:root /etc/init.d/tomcat
#chmod +x /etc/init.d/tomcat
#chmod 755 /etc/init.d/tomcat
#chown root:root /etc/init.d/tomcat
#find /opt/apache-tomcat-8.0.0-RC10/conf -type f -exec chmod 0400 {} \;
#find /opt/apache-tomcat-8.0.0-RC10/logs -type f -exec chmod 0300 {} \;
#chmod 750 /opt/apache-tomcat-8.0.0-RC10/logs
Change the server version string from HTTP headers in server responses by changing the server keyword in server.xml
Protect the shutdown port 8005. Modify server.xml and add a really complex password.
#vi /tmp/password
bhuvi
:wq!
#md5sum -t /tmp/password
0c527af825a4cd15ed00433c8f445ba6
bhuvi
:wq!
#md5sum -t /tmp/password
0c527af825a4cd15ed00433c8f445ba6
Edit server.xml file in conf directory.
#vi /opt/apache-tomcat-8.0.0-RC10/conf/server.xml
<Connector port=”8080″ protocol=”HTTP/1.1″
server=”Apache”
connectionTimeout=”20000″
redirectPort=”8443″ />
server=”Apache”
connectionTimeout=”20000″
redirectPort=”8443″ />
<Server port=”8005″ shutdown=”0c527af825a4cd15ed00433c8f445ba6″>
:wq!


#/etc/init.d/tomcat start
open web browser and type http://localhost:8080/ you should see the Tomcat Administration page

Now test Tomcat by removing contents in webapps and create a file in that directory.
#cd /opt/apache-tomcat-8.0.0-RC10/webapps
#rm -rf docs examples host-manger manager
#rm -rf docs examples host-manger manager
go to /opt/apache-tomcat-8.0.0-RC10/webapps/ROOT in the tomcat directory and create pagehello.html and write in it
#vi hello.html
Welcome to Linux Digest
:wq!
open the URL http://localhost:8080/hello.html you should see your page
Make JSP page
go to webapps/ROOT in the tomcat directory and create page hello.jsp and write in it the following lines
#vi hello.jsp
<%=new String(“Welcome to Linux Digest”)%>
<br>
<%=new java.util.Date()%>
<br>
<br>
<%=new java.util.Date()%>
<br>
:wq!
save and run the following URL http://localhost:8080/hello.jsp

Configure Secure Socket Layer (SSL)
Run the following commands as tomcat user:
#cd /opt/apache-tomcat-8.0.0-RC10/conf
Create Keystore using Java keytool
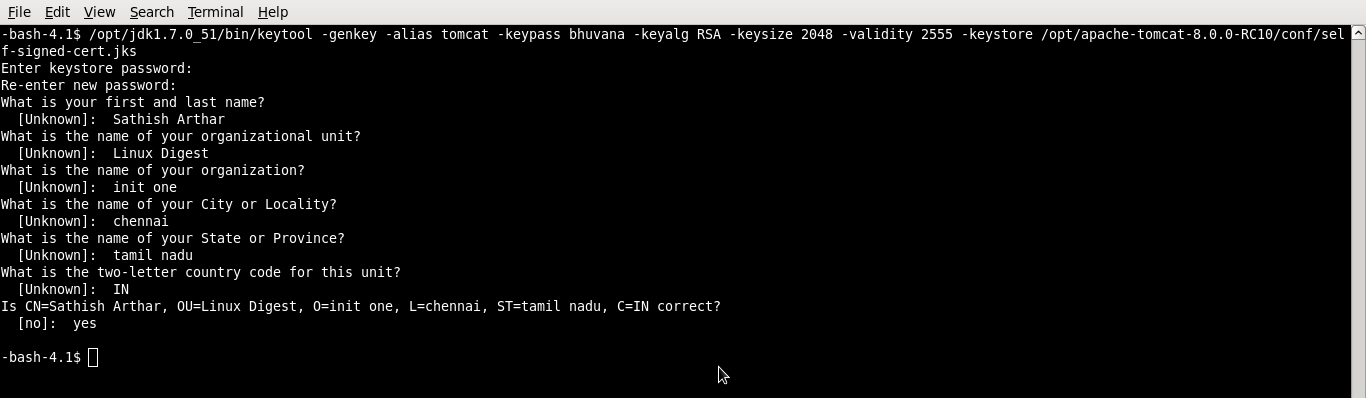
First use the keytool to create a java keystore as shown below. Make sure to note down the password that you enter while creating the keystore.
#su -p -s /bin/sh tomcat /opt/jdk1.7.0_51/bin/keytool -genkey -alias tomcat -keypass bhuvi -keyalg RSA -keysize 2048 -validity 2555 -keystore /opt/apache-tomcat-8.0.0-RC10/conf/self-signed-cert.jks
Locate the conf/server.xml file located under the tomcat directory. If the Connector port=”8443″ is commented out, you should uncomment it first. Please note that the comments in theserver.xml file are enclosed in <!– and –> as shown below. You should remove the 1st and last line from the following code snippet.
# vi /opt/apache-tomcat-8.0.0-RC10/conf/server.xml
<Connector port=”8443″
maxHttpHeaderSize=”8192″
server=”Apache”
maxThreads=”150″
minSpareThreads=”5″
maxSpareThreads=”75″
enableLookups=”false”
disableUploadTimeout=”true”
acceptCount=”100″
scheme=”https”
secure=”true”
SSLEnabled=”true”
clientAuth=”optional”
sslProtocol=”TLSv1″
keyAlias=”tomcat”
keystoreFile=”/opt/apache-tomcat-8.0.0-RC10conf/self-signed-cert.jks”
keystorePass=”bhuvi”
SSLProtocol=”all”
SSLCipherSuite=”all”
SSLVerifyClient=”none” />
<Host name=”localhost” appBase=”webapps”
unpackWARs=”true” autoDeploy=”true”
xmlValidation=”false” xmlNamespaceAware=”false” />
unpackWARs=”true” autoDeploy=”true”
xmlValidation=”false” xmlNamespaceAware=”false” />
:wq!


#/etc/init.d/tomcat stop
#/etc/init.d/tomcat start
Finally, restart the tomcat server and access the application using https://localhost:8443/

Relaying HTTP Port 80 Connections to Tomcat Port 8080:
By default, Tomcat listens on port 8080. To have the Tomcat server itself listen on HTTP port 80, Tomcat would have to run as root since only root can listen on ports below 1024 on Linux. But for security reasons this is not recommended. The solution I prefer is to relay port 80 TCP connections to port 8080 using the Netfilter package that comes with Linux. An alternate solution would be to use a service wrapper like jsvc from the Jakarta Commons Daemon project. But this solution would require the installation and maintenance of another piece of software on my system that I want to avoid.
The Netfilter package that comes already with Linux is transparent to Tomcat. The following steps show how to relay port 80 and 443 TCP connections to Tomcat’s port 8080 and 8443 using the iptables command from the Netfilter package.
Note that these steps must be executed as root:
Note that these steps must be executed as root:
#iptables -t nat -I PREROUTING -p tcp –dport 80 -j REDIRECT –to-ports 8080
#iptables -t nat -I PREROUTING -p tcp –dport 443 -j REDIRECT –to-ports 8443
#iptables -t nat -I OUTPUT -p tcp –dport 80 -j REDIRECT –to-ports 8080
#iptables -t nat -I OUTPUT -p tcp –dport 443 -j REDIRECT –to-ports 8443
The first rule redirects incoming requests on port 80 generated from other computer nodes, and the second rule redirects incoming requests on port 80 generated from the local node where Tomcat is running.
To see the newly configured rules, run:
#iptables -t nat -L
#iptables -t nat -L
To remove the NAT rules we just created, you can run the iptables -t nat -F command which flushes and deletes the rules. Note that this will also flush any other rules that may have been configured on your system! For more information on iptables, see netfilter/iptables documentation.
To make the rules permanent for reboots.
#service iptables save
It should be noted here that there is one Tomcat configuration parameter that you may or may not want to change, the proxyPort parameter in the server.xml file. Since Tomcat still receives requests on port 8080 as they are relayed by the Linux Netfilter system from port 80, Tomcat may display port 8080 in the URL depending on the application’s content. So if you want to change it to port 80, the proxyPort parameter would need to be added in the $CATALINA_BASE/conf/server.xml file for port 8080.
#vi /opt/apache-tomcat-8.0.0-RC10/conf/server.xml
<Connector port=”8080″ protocol=”HTTP/1.1″ proxyPort=”80″
server=”Apache”
connectionTimeout=”20000″
redirectPort=”8443″ />
server=”Apache”
connectionTimeout=”20000″
redirectPort=”8443″ />
<Connector port=”8443″ proxyport=”443″
:wq!
After that you need to restart Tomcat to make this change effective.
No comments:
Post a Comment