A network switch doesn’t foward packets to everyone in the network the same way as a network hub do, and so theoretically a person in the network cannot look at other person’s traffic. There are ways however to get through this problem, which is by performing arp spoofing.
Dsniff
This guide will just discuss how it is done without discussing the theory behind the process. To start is to install the necessary program, which is in this case is dsniff package which contains the arpspoof program that we need. In Ubuntu or any other Debian based distribution, it’s installable with the apt-get command as the following;
Installing (Ubuntu)
$ sudo apt-get install dsniff
Enable IP forwarding
To make sure the traffic is forwarded to the real destination as it reach our machine, the following command need to be run;
$ sudo echo 1 > /proc/sys/net/ipv4/ip_forward
This will make sure the connection of the target machine is not disconnected, and nobody should realize what we’re doing.
Run ARP spoofing
The following command will tell the gateway “I am 192.168.0.100”, and the next command tells 192.168.0.100 “I am the gateway”
With this, all the traffic that’s supposed to go to the gateway from the machine, and the other way around, will go through our machine first, and only then forwarded to the real target. With this we can run any packet analysis tool such as tcpdump or wireshark.
Ettercap
There are programs however to make the whole process simpler. One of the favored program for this is ettercap. Ettercap can perform arp spoofing as well, among many other features that it has. In Ubuntu, the package is called ettercap-gtk;
Installing (Ubuntu)
$ sudo apt-get install ettercap-gtk
Run ARP spoofing (GUI)
Running the program with the -G switch will run it in GTK rather than in ncurses.
$ sudo ettercap -G
At the menu, choose the following;
Sniff -> Unfied sniffing
And at the prompt, choose the network interface to be used. Normally it would be eth0
Network Interface: eth0
At the menu again, choose the following to add all hosts in the network to the list
Hosts -> Scan for hosts
And following the following will do the arp spoofing for everyone in the network
Mitm -> Arp poisoning -> Ok
Start -> Start sniffing
Run ARP spoofing (command)
The following command will do the same thing as the above example, in one single command;
sudo ettercap -q -T -M arp // //
- See more at: https://docs.oseems.com/general/operatingsystem/linux/sniff-network-traffic#sthash.prygEmOa.dpuf
ID 1 -反欺骗级:服务器产生的DoS攻击总是来源于虚假的源地址。通过这个命令,你可以控制IP地址的哪些部分是虚假的,哪些部分是真实的IP。
ID 2 -改变包尺寸:缺省的ICMP/8,smurf,udp攻击缺省使用最小包。你可以通过改变每个包的有效载荷的字节增加它的大小。
ID 3 - 绑定root shell:启动一个会话服务,然后你连接一个指定端口就可以得到一个root shell。
ID 4 - UDP flood 攻击:这个攻击是利用这样一个事实:每个udp包被送往一个关闭的端口,这样就会有一个ICMP不可到达的信息返回,增加了攻击的能力。
ID5 - SYN flood 攻击:这个攻击有规律的送虚假的连接请求。结果会是目标端口拒绝服务,添瞒TCP连接表,通过对不存在主机的TCP/RST响应增加攻击潜力。
ID 6 - ICMP响应(ping)攻击:这个攻击发送虚假地址的ping请求,目标主机会回送相同大小的响应包。
ID 7 - SMURF 攻击:用目标主机的地址发送ping请求以广播扩大,这样目标主机将得到回复一个多倍的回复。
ID 8 - MIX攻击:按照1:1:1的关系交替的发送udp,syn,icmp包,这样就可以对付路由器,其它包转发设备,NIDS,sniffers等。
ID 9 -TARGA3攻击
ID 10 - 远程命令执行:给予单路在服务器上执行大量远程命令的机会。更复杂的用法请看4.1节。
更多的选项请看命令行帮助。
使用tfn用于分布式任务
Using TFN for other distributed tasks
依照CERT的安全报告,新版本的DDOS工具包含一个最新流行的特点:软件的自我更新。
TFN也有这个功能,作者并没有显式的包含这个功能。在ID 10远程执行命令中给予用户在任意数量远程主机上以批处理的形式执行同样shell命令的能力。这同时也证明了一个问题:DDOS等类似的分布式网络工具不仅仅简单的用于拒绝服务,还可以做许多实际的事情。
使用方法:
usage: ./tfn
[-P protocol] Protocol for server communication. Can be ICMP, UDP or TCP.
Uses a random protocol as default
[-D n] Send out n bogus requests for each real one to decoy targets
[-S host/ip] Specify your source IP. Randomly spoofed by default, you need
to use your real IP if you are behind spoof-filtering routers
[-f hostlist] Filename containing a list of hosts with TFN servers to contact
[-h hostname] To contact only a single host running a TFN server
[-i target string] Contains options/targets separated by '@', see below
[-p port] A TCP destination port can be specified for SYN floods
<-c command ID> 0 - Halt all current floods on server(s) immediately
1 - Change IP antispoof-level (evade rfc2267 filtering)
usage: -i 0 (fully spoofed) to -i 3 (/24 host bytes spoofed)
2 - Change Packet size, usage: -i
3 - Bind root shell to a port, usage: -i
4 - UDP flood, usage: -i victim@victim2@victim3@...
5 - TCP/SYN flood, usage: -i victim@... [-p destination port]
6 - ICMP/PING flood, usage: -i victim@...
7 - ICMP/SMURF flood, usage: -i victim@broadcast@broadcast2@...
8 - MIX flood (UDP/TCP/ICMP interchanged), usage: -i victim@...
9 - TARGA3 flood (IP stack penetration), usage: -i victim@...
10 - Blindly execute remote shell command, usage -i command
Apache Tomcat (formerly also Jakarta Tomcat) is an open source web server and servlet container developed by the Apache Software Foundation (ASF). Tomcat implements the Java Servlet and the JavaServer Pages (JSP) specifications from Sun Microsystems, and provides a “pure Java” HTTP web server environment for Java code to run in. Tomcat is the result of an open collaboration of developers and is available from the Apache Web site in both binary and source versions. Tomcat can be used as either a standalone product with its own internal Web server or together with other Web servers, including Apache, Netscape Enterprise Server, Microsoft Internet Information Server (IIS), and Microsoft Personal Web Server. Tomcat requires a Java Runtime Enterprise Environment
Working:
Web server (apache) process web client (web browsers) requests and forwards it to servlet container (tomcat) and container process the requests and sends response which gets forwarded by web server to the web client (browser).
Installation:
First check JAVA is installed or not in your system, JAVA is the first requirement of Apache Tomcat installation. Use following command to check if you have java installed or not. #java -version
Installing Tomcat from a binary release (tar file) requires manual creation of the Tomcat user account. This is not necessary if you install the Tomcat RPM package on a Linux system that supports RPMs.
For security reasons I created a user account with no login shell for running the Tomcat server:
# groupadd tomcat # useradd -g tomcat -s /usr/sbin/nologin -m -d /home/tomcat tomcat (It should be noted that other Linux systems have nologin under /sbin not /usr/sbin)
In Command Prompt use these commands , Download & Install Apache tomcat.
For security reasons I don’t run the Tomcat server as user root but as tomcat which was created with no login shell. Therefore, to run Tomcat use the su command with the -p option to preserves all the environment variables when switching to tomcat (more on the Tomcat environment variables later). And since the tomcat account has no login shell, it needs to be specified with the -s option.
# su -p -s /bin/sh tomcat bin/startup.sh
Tomcat can be run as a daemon using the jsvc tool from the commons-daemon project. Source tarballs for jsvc are included with the Tomcat binaries, and need to be compiled. Building jsvc requires a C ANSI compiler (such as GCC), GNU Autoconf, and a JDK.
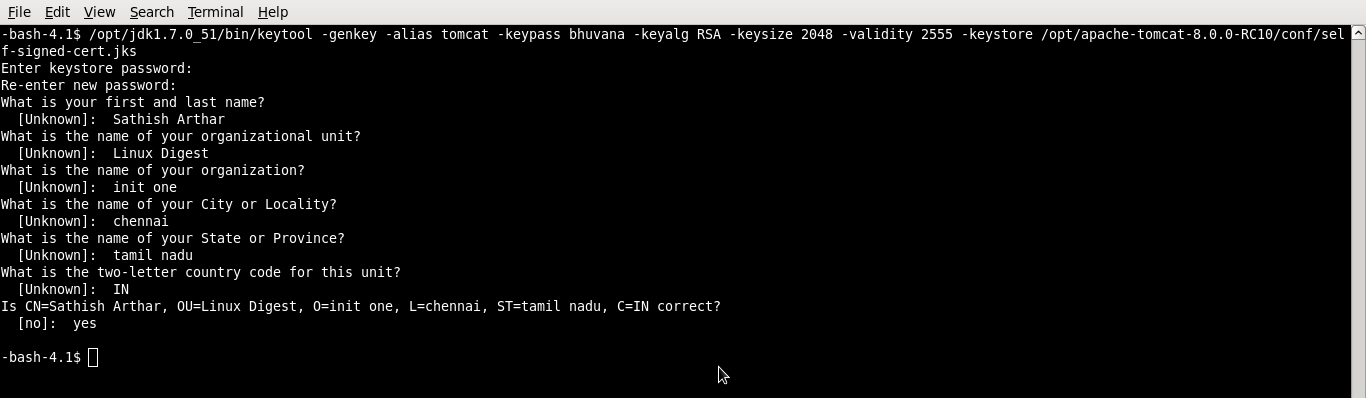
Locate the conf/server.xml file located under the tomcat directory. If the Connector port=”8443″ is commented out, you should uncomment it first. Please note that the comments in theserver.xml file are enclosed in <!– and –> as shown below. You should remove the 1st and last line from the following code snippet.
# vi /opt/apache-tomcat-8.0.0-RC10/conf/server.xml
Relaying HTTP Port 80 Connections to Tomcat Port 8080:
By default, Tomcat listens on port 8080. To have the Tomcat server itself listen on HTTP port 80, Tomcat would have to run as root since only root can listen on ports below 1024 on Linux. But for security reasons this is not recommended. The solution I prefer is to relay port 80 TCP connections to port 8080 using the Netfilter package that comes with Linux. An alternate solution would be to use a service wrapper like jsvc from the Jakarta Commons Daemon project. But this solution would require the installation and maintenance of another piece of software on my system that I want to avoid.
The Netfilter package that comes already with Linux is transparent to Tomcat. The following steps show how to relay port 80 and 443 TCP connections to Tomcat’s port 8080 and 8443 using the iptables command from the Netfilter package. Note that these steps must be executed as root:
The first rule redirects incoming requests on port 80 generated from other computer nodes, and the second rule redirects incoming requests on port 80 generated from the local node where Tomcat is running.
To see the newly configured rules, run: #iptables -t nat -L
To remove the NAT rules we just created, you can run the iptables -t nat -F command which flushes and deletes the rules. Note that this will also flush any other rules that may have been configured on your system! For more information on iptables, see netfilter/iptables documentation.
To make the rules permanent for reboots.
#service iptables save
It should be noted here that there is one Tomcat configuration parameter that you may or may not want to change, the proxyPort parameter in the server.xml file. Since Tomcat still receives requests on port 8080 as they are relayed by the Linux Netfilter system from port 80, Tomcat may display port 8080 in the URL depending on the application’s content. So if you want to change it to port 80, the proxyPort parameter would need to be added in the $CATALINA_BASE/conf/server.xml file for port 8080.
Installing OpenDKIM RPM via Yum with Postfix or Sendmail (for RHEL / CentOS / Fedora)
Before you start
This tutorial assumes the following:
You are running a “modern” RedHat-compatible Linux distro (RHEL 5/6/7, CentOS 5/6/7, Fedora, etc).
You are running a milter-aware MTA, such as Postfix 2.3.3 or newer (do postconf -d mail_version to check) or Sendmail.
Your Postfix or Sendmail configuration is currently working(this is very important – you don’t want to troubleshoot two programs at once).
If you’re using Postfix, Sendmail is turned off (do service sendmail status to verify).
If you’re using Sendmail, Postfix is turned off (do service postfix status to verify).
The necessary commands in this tutorial are done as root. If you don’t know what that means, then you probably shouldn’t be doing this. You may be able to get away with just using sudo, but I wanted to make sure I didn’t run into any path issues, so I do it as root.
Install OpenDKIM with Yum
If you’re running Fedora 14 (or newer) or RHEL/CentOS 5 (or newer) then you can use Yum to quickly install OpenDKIM (RHEL/CentOS users must have the EPEL repositories enabled). Just do:
yum install opendkim
This will download and install OpenDKIM with all the default configuration options included below.
For those who like getting their hands dirtier, you can manually download one of my RPMs or even build your own RPM from my Source RPM, which are all available through the Fedora BuildSystem.
Generate keys for signing
Now you’re getting to the fun part. You need to generate a privateand a public key for each of the domains for which you wish to sign mail. The private key is stored away from prying eyes on your server, while the public key gets published in your domain’s DNS records so that receiving mail servers can verify your DKIM-signed mail.
To make things easy, the first time you start opendkim after installing the RPM package, it will generate a default set of keys in/etc/opendkim/keys/ using your server’s domain name and the selector name “default.” However, if you want to sign for any virtual hosts or choose a different selector name than then default, you can easily generate your own keys. It really only takes a few seconds. Or, if you’re happy with the default keys, you can move on to the next step.
If you’re really hard-core, you can always build the keys manually. Or, you can use the easy script included with OpenDKIM to do it for you. I’ve manually generated enough keys in my life, so I use the script.
Before running this script, decide now what the name of yourselector is going to be. A selector is a unique keyword that is associated with both keys (public and private), included in all the signatures, and published in your DNS records. For simplicity, I use the word default as my default selector. Not very creative, but it’s effective. Feel free to choose something different, but if you do, you’ll need to use it consistently throughout your setup. Also, while this should go without saying, you should use your mail domain instead of example.com throughout the following steps.
You can do a man opendkim-genkey if you’re interested in what additional options are available when creating your keys. In this example, I used the -D (directory) option, the -d (domain) option, and the -s (selector) options. That’s all you need to get this going.
Edit the configuration files
You’re getting really close now. You need to create and/or edit fourfiles:
/etc/opendkim.conf – OpenDKIM’s main configuration file
/etc/opendkim/KeyTable – a list of keys available for signing
/etc/opendkim/SigningTable - a list of domains and accounts allowed to sign
/etc/opendkim/TrustedHosts – a list of servers to “trust” when signing or verifying
On install, the RPM package should have created a simple/etc/opendkim.conf file on your system. Because signed outbound mail could get flagged as Spam if sent before your DNS DKIM text records are properly set up, the default operating mode set by this file is verification only (v). This means that order to sign outgoing mail, you’ll have to comment, uncomment, and configure some additional options in the configuration file. Use your favorite text editor to open /etc/opendkim.conf and make it look like this:
## CONFIGURATION OPTIONS

# Specifies the path to the process ID file.
PidFile /var/run/opendkim/opendkim.pid

# Selects operating modes. Valid modes are s (signer) and v (verifier). Default is v.
Mode    sv

# Log activity to the system log.
Syslog  yes

# Log additional entries indicating successful signing or verification of messages.
SyslogSuccess yes

# If logging is enabled, include detailed logging about why or why not a message was
# signed or verified. This causes a large increase in the amount of log data generated
# for each message, so it should be limited to debugging use only.
#LogWhy yes

# Attempt to become the specified user before starting operations.
UserID  opendkim:opendkim

# Create a socket through which your MTA can communicate.
Socket  inet:8891@127.0.0.1

# Required to use local socket with MTAs that access the socket as a non-
# privileged user (e.g. Postfix)
Umask   002

# This specifies a file in which to store DKIM transaction statistics.
#Statistics              /var/spool/opendkim/stats.dat

## SIGNING OPTIONS

# Selects the canonicalization method(s) to be used when signing messages.
Canonicalization        relaxed/simple

# Domain(s) whose mail should be signed by this filter. Mail from other domains will
# be verified rather than being signed. Uncomment and use your domain name.
# This parameter is not required if a SigningTable is in use.
Domain                  example.com

# Defines the name of the selector to be used when signing messages.
Selector                default

# Gives the location of a private key to be used for signing ALL messages.
#KeyFile                 /etc/opendkim/keys/default.private

# Gives the location of a file mapping key names to signing keys. In simple terms,
# this tells OpenDKIM where to find your keys. If present, overrides any KeyFile
# setting in the configuration file.
KeyTable                 refile:/etc/opendkim/KeyTable

# Defines a table used to select one or more signatures to apply to a message based
# on the address found in the From: header field. In simple terms, this tells
# OpenDKIM how to use your keys.
SigningTable                 refile:/etc/opendkim/SigningTable

# Identifies a set of "external" hosts that may send mail through the server as one
# of the signing domains without credentials as such.
ExternalIgnoreList      refile:/etc/opendkim/TrustedHosts

# Identifies a set internal hosts whose mail should be signed rather than verified.
InternalHosts           refile:/etc/opendkim/TrustedHosts
You can do man opendkim.conf for more information on each of the options in this file.
Uncomment the Domain option (and include your actual domain name), the KeyTable, SigningTable, ExternalIgnoreList, andInternalHosts options. Also, since you’ll be using a KeyTable, you can comment the KeyFile option.
Next, you’ll need to create the three text files that you just uncommented in your config file. First, using your favorite text editor, create an /etc/opendkim/KeyTable file that looks like this:
The KeyTable file tells OpenDKIM where to find your keys. Each entry in the KeyTable file is a single line for each key location (for example, all of the text in the above example should be on a single line in your file). If you’re going to use multiple keys (to sign mail for virtual domains with different keys, for example), you’ll need to create a separate line in the KeyTable file for each domain, like this:
Next, you need to create or edit the /etc/opendkim/SigningTablefile. A default version of this file should have been installed in/etc/opendkim when you installed the RPM, so just uncomment the following line (or edit the file to include this line) so it reads:
*@example.com default._domainkey.example.com
The SigningTable file tells OpenDKIM how to use your keys, as in which senders should use which selectors for their signatures. In the above example, I’m saying that everyone (*) sending mail from the server “example.com” should use the selector named “default.” Again, for multiple domains and/or users, you’ll need multiple lines, like this:
In that example, everyone (*) sending mail from the server “example.com” can sign mail and should use the selector named “default.” But only Bob and Doug can sign mail for “example2.com” (also using a selector named default). It’s important to note that the * wildcard symbol will only work if the SigningTable option uses the refile: prefix before the filename (see the opendkim.conf documentation for more details).
Next, create an /etc/opendkim/TrustedHosts file that looks like this:
The TrustedHosts file tells OpenDKIM who to let use your keys. Because it’s referenced by the ExternalIgnoreList directive in your conf file, OpenDKIM will ignore this list of hosts when verifyingincoming mail. And, because it’s also referenced by theInternalHosts directive, this same list of hosts will be considered “internal,” and OpenDKIM will sign their outgoing mail.
IMPORTANT: Make sure you list the IP address for localhost (127.0.0.1) in the TrustedHosts file or OpenDKIM won’t sign mail sent from this server. If you have multiple servers on the same network that relay mail through this server and you want to sign their mail as well, they must be listed in the TrustedHosts file. Put each entry on its own line. An entry can be a hostname, domain name (e.g. “example.com”), IP address, an IPv6 address (including an IPv4 mapped address), or a CIDR-style IP specification (e.g. “192.168.1.0/24″).
It should also go without saying (but I’ll say it anyway) that if you’re planning to sign outgoing mail for remote hosts, your mail server should have been previously configured to allow relaying for those hosts.
Edit your MTA configuration
Now you’re ready to tell your MTA about OpenDKIM.
Postfix Users:
Telling Postfix about OpenDKIM is easy. Just add the following lines to your Postfix main.cf file:
Then build and install a new sendmail.cf. If you don’t know how to build and install a sendmail.cf file, a quick Web search should shove you in the right direction. Explaining how to do that is beyond the scope of these instructions. I will, however, remind you that backing up your current sendmail.cf file is a good idea before you attempt any modifications.
Start OpenDKIM and restart your MTA
It’s time to fire things up! Assuming you’re using bash, do:
hash -r
to rehash your shell so you can find the init script.
Now start OpenDKIM with:
service opendkim start
You should get a message that says:
Starting OpenDKIM Milter: [ OK ]
However, if you get an error message such as:
Starting OpenDKIM Milter: opendkim: /etc/opendkim.conf: configuration error at line 6: unrecognized parameter
don’t freak out. You probably just mistyped something in one of the config files. Go to the line number of the file listed, and check your work against the example(s) in this article. Then try starting up OpenDKIM again.
Once it starts, Postfix users should refresh Postfix with:
postfix reload
and Sendmail users should do:
service sendmail restart
If everything looks good, I recommend running chkconfig on OpenDKIM to make sure it starts when you boot your server:
chkconfig opendkim on
Adding DNS Records
Now that your mail server is signing outgoing mail and verifying incoming mail, you’ll need to put some information in your DNS records to tell other mail servers how your keys are set up, and provide the public key for them to check that your mail is properly signed. Do:
cat /etc/opendkim/keys/example.com/default.txt
The output should look something like this:
default._domainkey IN TXT ( "v=DKIM1; k=rsa; "
          "p=MIGfMA0GCSqGSIb3DQEBAQUAA4GNADCBiQKBgQDHY7Zl+n3SUldTYRUEU1BErHkKN0Ya52gazp1R7FA7vN5RddPxW/sO9JVRLiWg6iAE4hxBp42YKfxOwEnxPADbBuiELKZ2ddxo2aDFAb9U/lp47k45u5i2T1AlEBeurUbdKh7Nypq4lLMXC2FHhezK33BuYR+3L7jxVj7FATylhwIDAQAB" )  ; ----- DKIM default for example.com
If you manage your own DNS or have full access to your domain’s zone file, you’ll need to paste the entire contents of the default.txtfile at the bottom of your domain’s zone file. If you’re using a web interface to manage your zone file, be careful that the long lines of the public key don’t wrap and create line-feed characters (or fix them if they do). Otherwise, your public key won’t work.
If you’re using a web-based DNS interface (like GoDaddy or CloudFlare), the Name of the TXT record would default._domainkey and the Value of the TXT record would beeverything from the first quote to the last quote (starting with “v=). You can ignore the parentheses, semi-colon, and comments at the end. In the above example, what you’d paste in as the value would be:
If you’re using some other third-party DNS provider, follow their instructions for adding a new TXT Record.
And, as long as you’re messing with your domain’s zone file, now might be a good time to ensure that you already have a valid SPF Record in place. Having both DKIM and SPF in place will increase your chances of having your outgoing mail successfully delivered.
Testing Things Out
As I mentioned in my troubleshooting tips, the best way to see that everything is working on the server side is to keep an eye on your/var/log/maillog file. Do a:
tail -f /var/log/maillog
When OpenDKIM starts (or restarts), you should see lines like:
The best way to check that your signed mail is being authenticated and that your DNS records are properly set up is to use one of the free testing services. My favorites are:
(you can put all of the test email addresses in the To: field of a single outgoing message to test)
Each of these will tell you if things are working properly, and give you some pointers on troubleshooting if needed.
If you have a Gmail account, you can also send a signed message there for a quick and easy test. address Here’s what a signed message in Gmail will look like:
Look, Ma! My emails have DKIM Signatures!
The signed by: line tells you that the message has been verified as signed by the sender (you may need to press the show details link near the top of the message to see it). I like to click the Show Original link (under the Reply drop-down on the right) to see the signed headers in all their glory.
Troubleshooting Tips
Tip 1: The best advice I can give when troubleshooting any mail issues (including OpenDKIM) is to start a second shell session in another window and do:
tail -f /var/log/maillog
while you’re starting, stopping, and/or restarting OpenDKIM and your MTA. This allows you to see more details about any errors in your configuration.
Tip 2: If OpenDKIM is starting properly and logging to your mail log, but your outgoing mail isn’t getting signed, the first thing to check is whether the default operating mode is still set to the default verification only (v) instead of sign and verify (sv) in /etc/opendkim.conf. Change the Mode to sv, restart OpenDKIM, and try sending your test message again.
Tip 3: To get the most verbose information from OpenDKIM, make sure the LogWhy option in your /etc/opendkim.conf file is uncommented and set to Yes. If your outgoing mail isn’t getting signed and you want to know why, this should tell you.
Tip 4: If you can’t get things working on your own, I recommend subscribing to the OpenDKIM-Users discussion list at http://lists.opendkim.org/. It’s a low-traffic list with very helpful and friendly members (including me!) who are happy to nudge you in the right direction.
Automating Configuration and Key Generation for Multiple Domains
If you’re hosting a large number of domains, generating keys and editing all the appropriate files can be time-consuming. The following script was submitted by a reader (Almir Duarte Jr.) to help speed up the process. Use at your own risk.
Sendmail DKIM – a detailed article from Eland Systems about DKIM. They use the dkim-milter package, upon which OpenDKIM is based. I much prefer the newer OpenDKIM, but this article explains DKIM very well and has some good tips.
Mail-DKIM and DKIM-proxy – my first experiments with DKIM were with these tools. I never got it working quite right, but there’s lots of good info there.
OpenSPF.org – not technically related to DKIM, but it’s another spam-fighting technique that you should be using if you’re sending email
My OpenDKIM GitHub repo – if you’d like to mess with the SPEC file or patches that I use to create the OpenDKIM package in the Fedora & EPEL repos, knock yourself out! Please fork the “develop” branch and submit your pull requests there, as the “master” is intended only for release versions.
Good luck! Pease post in the comments with your successes, questions, or suggestions.