Sunday, 7 December 2014

How To Add and Delete Users on Ubuntu 12.04 and CentOS 6

How To Add and Delete Users on Ubuntu 12.04 and CentOS 6

What the Red Means

The lines that the user needs to enter or customize will be in red in this tutorial! The rest should mostly be copy-and-pastable.
When you log into a new freshly spun up droplet, you are accessing it from the root user. Although this gives you the power to make any changes you need on the server, you are much better off creating another new user with root privileges on the virtual private server. Additionally, if other people will be accessing the virtual server, you will need to make new users for them as well. This tutorial will go over creating a new user, granting them root privileges, and deleting users.
When you perform any root tasks with the new user, you will need to use the phrase “sudo” before the command. This is a helpful command for 2 reasons: 1) it prevents the user making any system-destroying mistakes 2) it stores all the commands run with sudo to a file where can be reviewed later if needed. Keep in mind however, that this user is as powerful as the root user. If you only need a user for a limited number of tasks on the VPS, you do not need to give them root privileges.

Setup

This tutorial requires access to the root user or a user with sudo privileges.
You should have received your root password from the welcome email after you launched your droplet.

Users on Ubuntu 12.04

How to Add a User on Ubuntu 12.04

To add a new user in Ubuntu, use the adduser command, replacing the “newuser” with your preferred username.
sudo adduser newuser
As soon as you type this command, Ubuntu will automatically start the process:
  • Type in and confirm your password
  • Enter in the user’s information. This is not required, pressing enter will automatically fill in the field with the default information
  • Press Y (or enter) when Ubuntu asks you if the information is correct
Congratulations—you have just added a new user. You can log out of the root user by typing exit and then logging back in with the new username and password.

How to Grant a User Root Privileges

As mentioned earlier, you are much better off using a user with root privileges.
You can create the sudo user by opening the sudoers file with this command:
sudo /usr/sbin/visudo
Adding the user’s name and the same permissions as root under the the user privilege specification will grant them the sudo privileges.
# User privilege specification
root    ALL=(ALL:ALL) ALL 
newuser ALL=(ALL:ALL) ALL
Press ‘cntrl x’ to exit the file and then ‘Y’ to save it.

How to Delete a User

Should you find that you find that you no longer want to have a specific user on the virtual private server you can delete them with a single command.
sudo userdel newuser
Finish up by the deleting the user’s home directory:
 sudo rm -rf /home/newuser

Users on CentOS 6

How to Add a User on CentOS 6

To add a new user in CentOS, use the adduser command, replacing the “newuser” with your preferred username.
sudo adduser newuser
Follow up by providing the user with a new password, typing and confirming the new password when prompted:
sudo passwd newuser
Congratulations—you have just added a new user and their password. You can log out of the root user by typing exit and then logging back in with the new username and password.

How to Grant a User Root Privileges

As mentioned earlier, you are much better off using a user with root privileges.
You can create the sudo user by opening the sudoers file with this command:
sudo /usr/sbin/visudo
You will find the section to make the user privilege modifications at the bottom of the file. Type “a” to start inserting text. Adding the user’s name and the same permissions as root under the the user privilege specification will grant them the sudo privileges.
## Allow root to run any commands anywhere
root    ALL=(ALL)       ALL
newuser ALL=(ALL)       ALL
Save and Exit the file by press “shift” ZZ.

How to Delete a User

Should you find that you find that you no longer want to have a specific user on the virtual private server you can delete them with a single command.
sudo userdel newuser
You can add the flag “-r” to the command if you would like to simultaneously remove the users’s home directory and files.
sudo userdel -r newuser

Wednesday, 8 October 2014

How To Create a Shortcut That Lets a Standard User Run An Application as Administrator

Enabling the Administrator Account

First you’ll need to enable the built-in Administrator account, which is disabled by default.
To do so, search for Command Prompt in the Start menu, right-click the Command Prompt shortcut, and select Run as administrator.
image
Run the following command in the elevated Command Prompt window that appears:
net user administrator /active:yes
image
The Administrator user account is now enabled, although it has no password.
To set a password, open the Control Panel, select User Accounts and Family Safety, and select User Accounts. Click the Manage another account link in the User Accounts window.
image
Select the Administrator account, click Create a password, and create a password for the Administrator account.
image

Creating the Shortcut

Now we’ll create a new shortcut that launches the application with Administrator privileges.
Right-click the desktop (or elsewhere), point to New, and select Shortcut.
image
Enter a command based on the following one into the box that appears:
runas /user:ComputerName\Administrator /savecred “C:\Path\To\Program.exe
Replace ComputerName with the name of your computer and C:\Path\To\Program.exe with the full path of the program you want to run. For example, if your computer’s name was Laptop and you wanted to run CCleaner, you’d enter the following path:
runas /user:Laptop\Administrator /savecred “C:\Program Files\CCleaner\CCleaner.exe”
image
Enter a name for the shortcut.
image
To select an icon for your new shortcut, right-click it and select Properties.
image
Click the Change Icon button in the Properties window.
image
Select an icon for your shortcut. For example, you can browser to CCleaner.exe and choose an icon associated with it. If you’re using an other program, browse to its .exe file and select your preferred icon.
image
The first time you double-click your shortcut, you’ll be prompted to enter the Administrator account’s password, which you created earlier.
image
This password will be saved – the next time you double-click the shortcut, the application will launch as Administrator without asking you for a password.

As we mentioned above, the standard user account now has the ability to run any application as Administrator without entering a password (using the runas /savecred command to launch any .exe file), so bear that in mind.
The Administrator password is saved in the Windows Credential Manager – if you want to remove the saved password, you can do it from there.

Sunday, 14 September 2014

How to Install Webmin on CentOS/RHEL 6/5 and Fedora 20/19

Webmin is a web-based interface for managing Unix like systems. Its provides options to setup user accounts, Apache, DNS, file sharing and much more. All recent versions of webmin are under a BSD-like licence.
webmin-large-image
This article will help you to install and configure Webmin on CentOS, RHEL and Fedora systems. Kindly go through below steps.
Step 1: Download Webmin RPM
Webmin rpms are available on its official site. Download it from there or use below command to download. Webmin provide noarch file, so i can be easily installed on any architecture system. Also download GPG key for webmin
# cd /opt
# wget http://www.webmin.com/jcameron-key.asc
# wget http://prdownloads.sourceforge.net/webadmin/webmin-1.680-1.noarch.rpm
Step 2: Install Webmin Using rpm Command
After downloading webmin rpm, use following command to install or update it. Before installing webmin import the PGP key.
# rpm --import jcameron-key.asc
# rpm -Uvh webmin-1.680-1.noarch.rpm
Step 3: Access Webmin in Browser
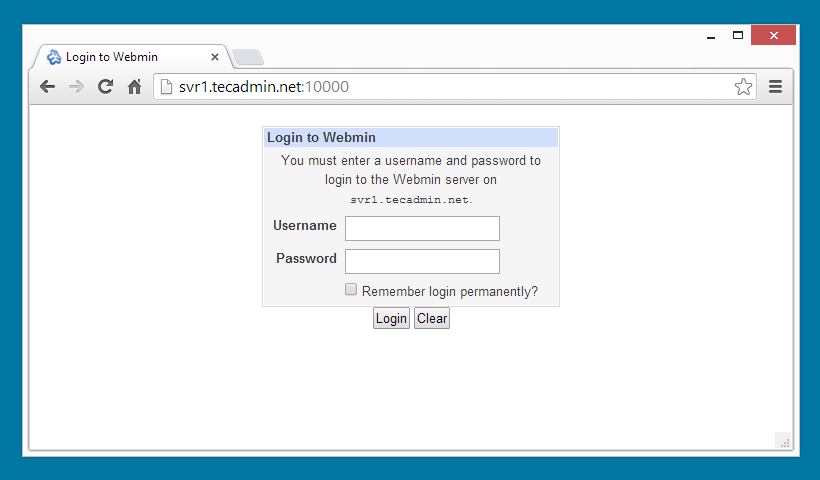
Webmin by default works on port 10000. Access your server on port 10000 using FQDN or IP, and login with username root and system root password.
http://srv1.tecadmin.net:10000

webmin-install

FAQs:-

How to Start/Stop Webmin Service

Webmin provides an init script to start or stop its service. Use below commands to do it.
# /etc/init.d/webmin start
# /etc/init.d/webmin stop
# /etc/init.d/webmin restart
# /etc/init.d/webmin status

How to Change/Reset Webmin root Password

In order to change webmin root account password use following command. ( Note: It will not change your systems root password )
# /usr/libexec/webmin/changepass.pl /etc/webmin root secretpassword

How to Change Webmin default Port

If you do not want to run webmin with default port, use below steps to change the default port.
Login Webmin as root >> Webmin >> Webmin Configuration >> Ports and Addresses… you can change port there.

Thursday, 11 September 2014

Install and Configure Zentyal Linux 3.5 as A BDC (Backup Domain Controller)

Install and Configure Zentyal Linux 3.5 as A BDC (Backup Domain Controller)

Download Your Free eBooks NOW - 10 Free Linux eBooks for Administrators
On 1st July 2014, Zentyal developers announced the release of Zentyal Linux 3.5 Community Small Business Server, a native drop-in replacement for Windows Small Business Server and Microsoft Exchange Server based on Ubuntu 14.04 LTS. This release comes with new features, the most important being a single implementation of LDAP based on Samba4 and Microsoft Outlook 2010 support, while some modules found in previous versions have been completely removed: FTP Server, Zarafa Mail, User Corner, Bandwidth Monitor, Captive Portal and L7 Filer.
Install Zentyal 3.5 Linux
Configure Zentyal 3.5 as BDC
Following former topics on Zentyal 3.4 installed and used as a PDC, this tutorial will concentrate on how you can configure Zentyal 3.5 Server to act as a BDC – Backup Domain Controller for Windows Servers or Zentyal 3.4 or 3.5 PDC, by replicating user accounts database, but skipping installation guides since it can be used the same procedure as described for Zentyal 3.4, without setting as a PDC.

Requirements

  1. Download Zentyal 3.5 Community Edition CD ISO image – http://www.zentyal.org/server/
  2. Install Zentyal 3.5 using the same procedure as described for Zentyal Linux 3.4.

Step 1: Install Required Modules for Zentyal BDC

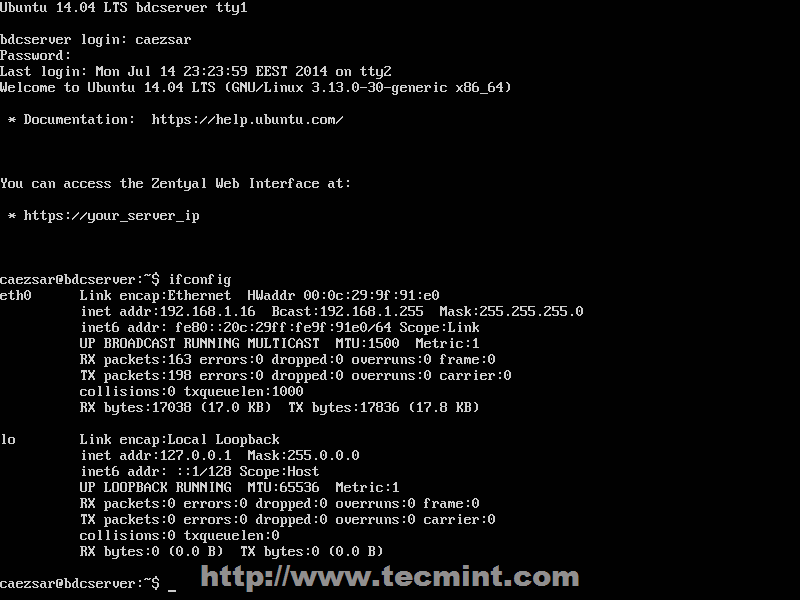
1. After a fresh installation of Zentyal 3.5 Server, login to console prompt and verify your server IP address using ifconfig command, if you use a DHCP server on your network that automatically assigns IP addresses to your network hosts, to be able to login to Zentyal Web Administration.
Verify Zentyal IP Address
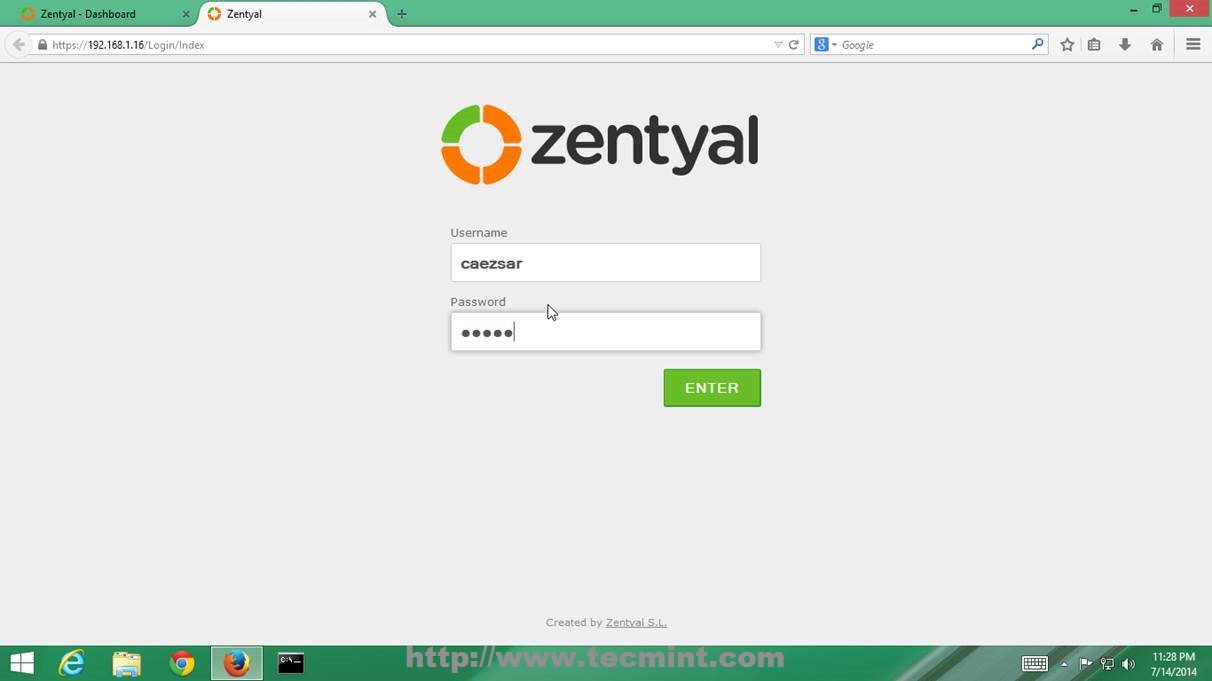
2. After you get your Zentyal system IP address, open a browser from a remote location and login to Web Remote Admin Interface using the address https://zentyal_IP and credentials configured for Zentyal Admin User on installation process.
Login to Zentyal Web Interface
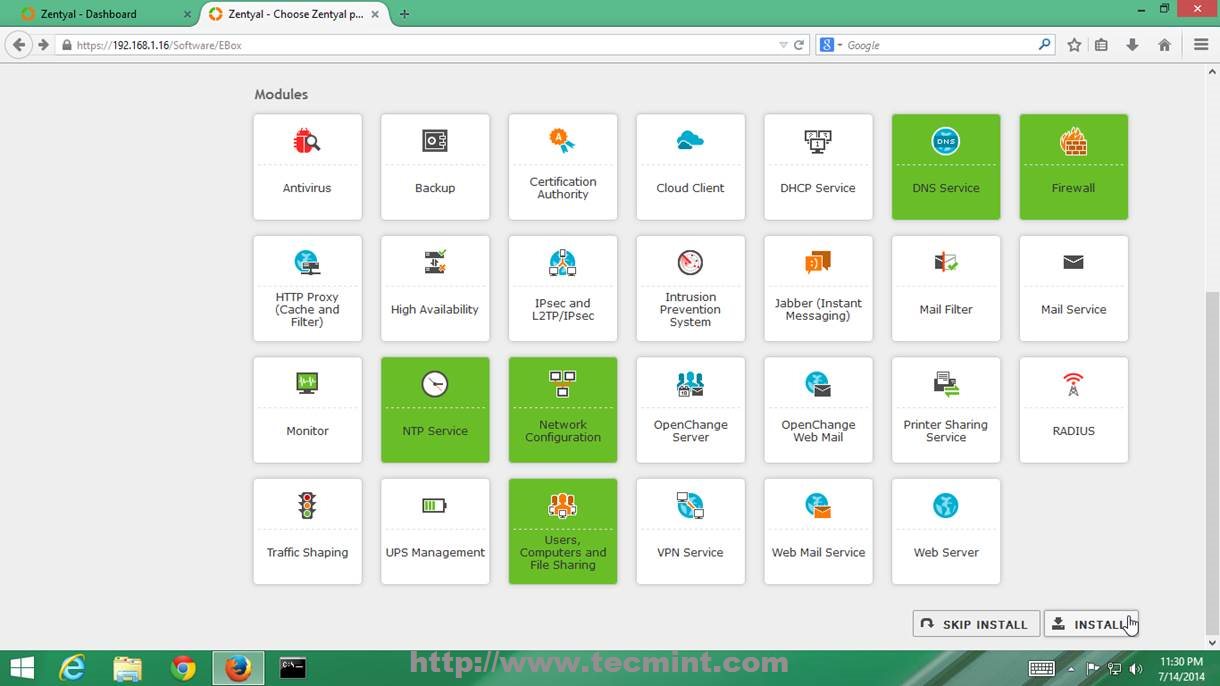
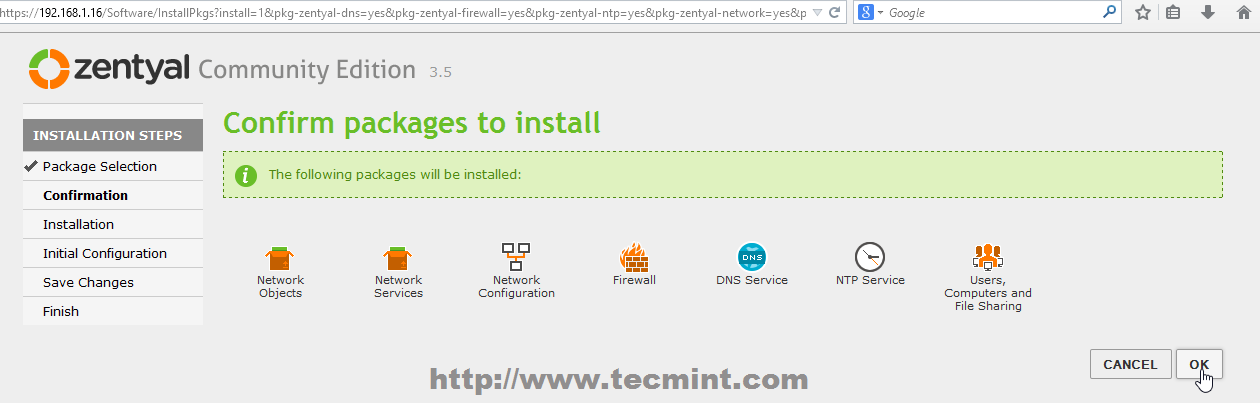
3. On the first window choose the following Zentyal packages to install so you can configure your server to act as a BDC and hit on OK button on next prompt.
  1. DNS Service
  2. Firewall
  3. NTP Service
  4. Network Configuration
  5. Users, Computers and File Sharing
Install Zentyal Software Packages
Confirm Zentyal Packages
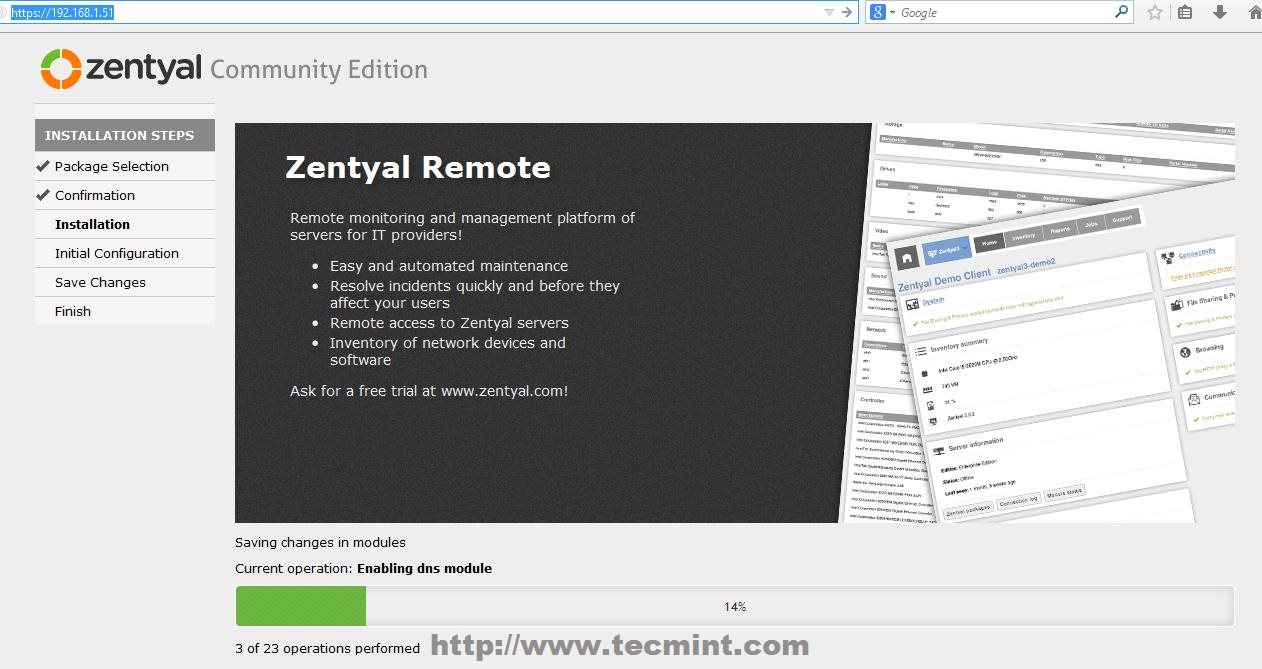
4. Zentyal Ebox will start installing the required packages with their dependencies and when will reach Network Interfaces configuration wizard. Here setup your Network Interface asInternal and hit on Next button to proceed further.
Configure Zentyal Network Interface
Configure Network Interface
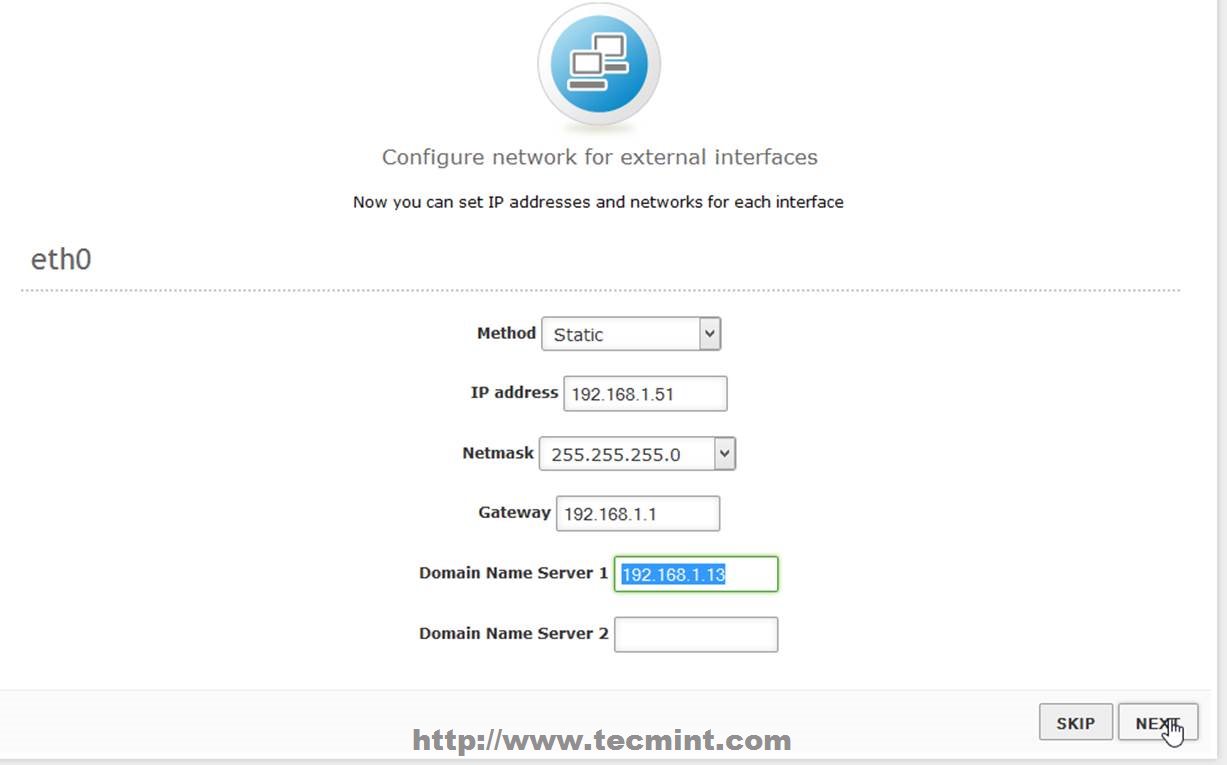
5. Due to the fact that you will be using Zentyal as a BDC in your network interface, must be assigned with a static IP address. Choose Static as IP configuration Method, provide your local network static IP Address, Netmask and Gateway and – very important – choose your Primary Domain Controller IP Address or the servers responsible for DNS PDC resolutions to be used on Domain Name Server field, then click on Next to continue.
Enter Network Interface Details
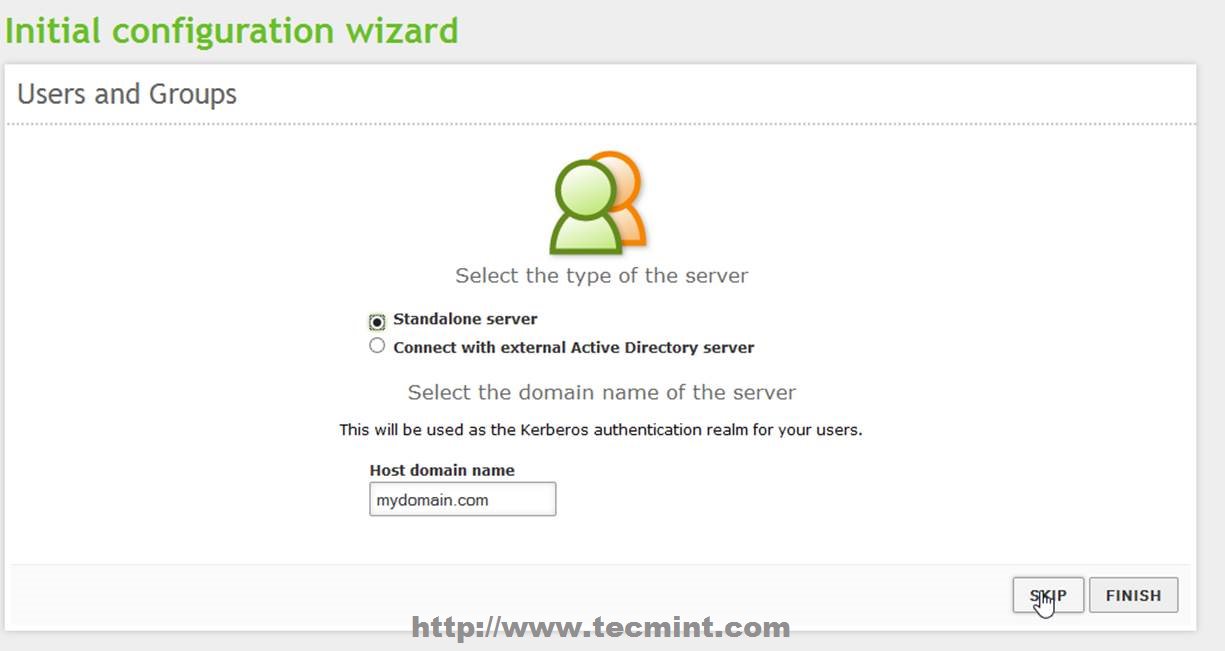
6. On the next stage on Users and Groups leave it as default and hit Skip button and the modules installation should continue.
Select Default Server
7. After this step if you configured other static IP Address than the one automatically issued by DHCP server, you will lose connectivity to Zentyal Server from browser. To re-login, go back to browser and type your newly Static IP Address that you manually added above on step 5and use the same credentials as earlier.
Re-Login to Zentyal Web Portal
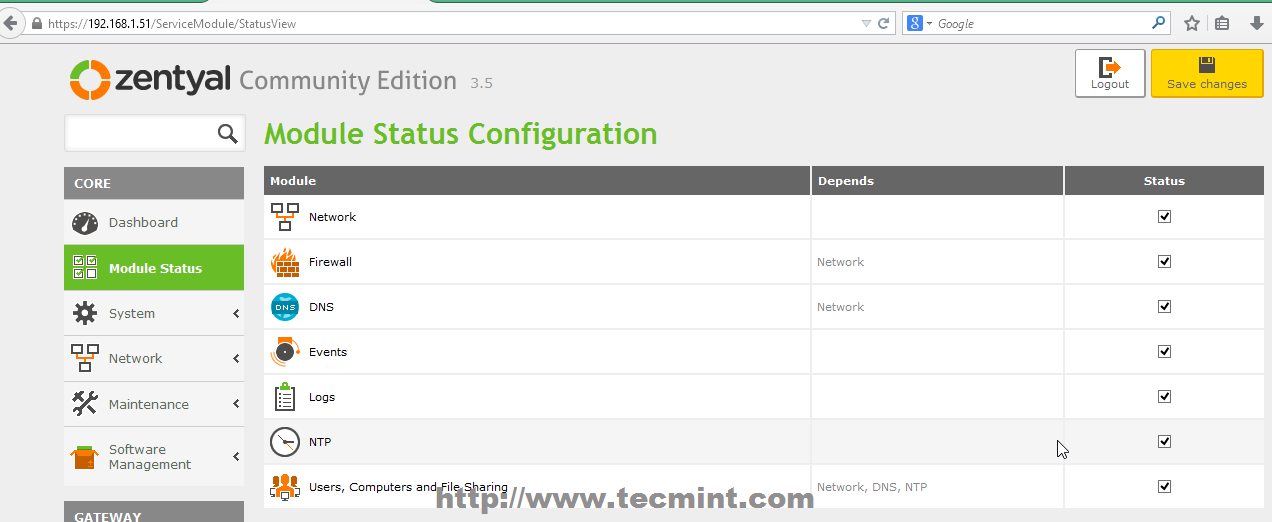
8. After all modules finish installing move to Module Status, make sure you check all modules listed, hit on above Save Changes button and click again on Save button prompt to apply changes and start modules.
Module Status Configuration

Step 2: Setup Zentyal 3.5 as a BDC

9. After all required modules installed and operational, it’s time to configure Zentyal 3.5 to act as a Backup Domain Controller or Additional Domain Controller by synchronizing User Accounts Database.
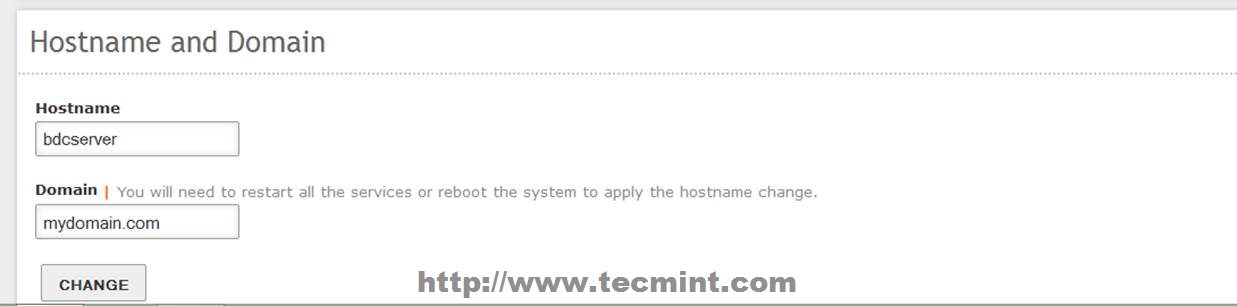
10. Go to System -> General -> Hostname and Domain and check your Hostname and Domainname entries – provide an descriptive name for Hostname, like bdc for example and use your main domain name on Domain field – by default this step should be configured on system installation process by choosing your server BDC hostname.
Enter Hostname and Domain
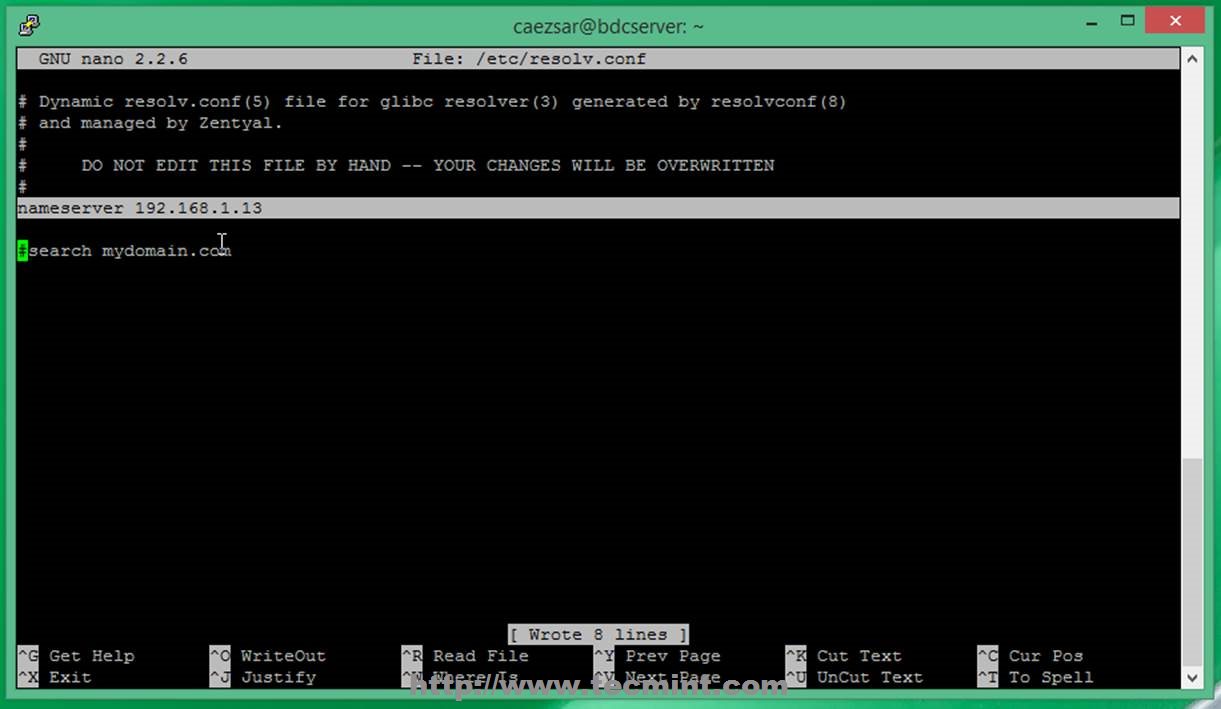
11. But before starting to join the main domain, assure that you have connectivity and DNS resolution to Primary Domain Controller Server. First open Putty, login to your Zentyal BDC server and edit resolv.conf file to point to your Primary Domain Controller IP Address or DNS Server Address responsible with PDC name resolutions.
# nano /etc/resolv.conf
This file is automatically generated by Zentyal DNS Resolver and manual changes will be overwritten after modules restart. Replace nameserver statement line with your Primary Domain Controller IP Address (in this case my Zentyal PDC has 192.168.1.13 IP Address – change it accordingly).
Add Primary Domain Controller DNS
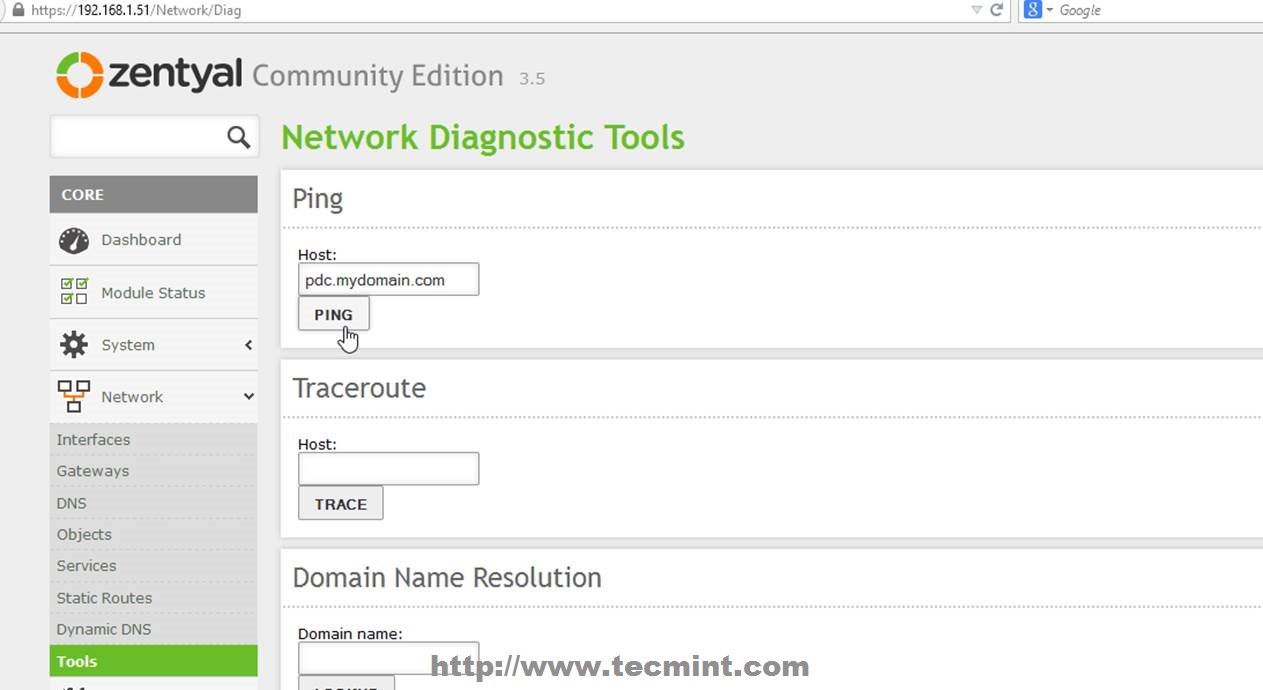
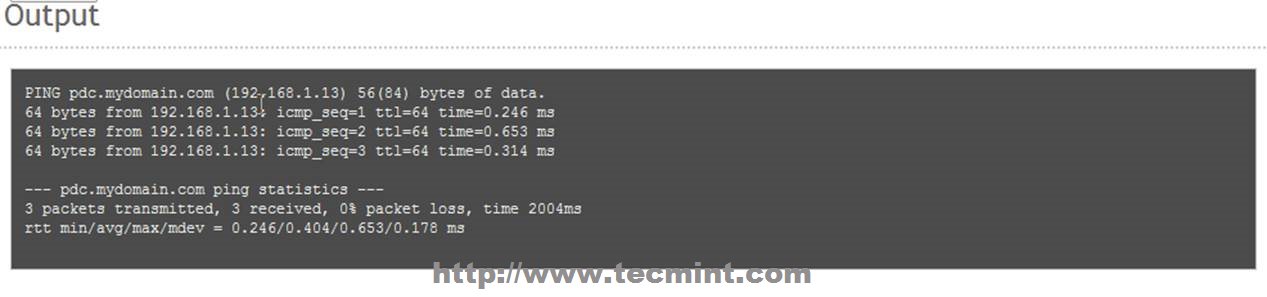
12. After the file was edited, don’t restart any modules at all and issue a ping command with your Primary Domain Controller FQDN domain name and verify if it responds with the correct IP Address (in this case my PDC FQDN is pdc.mydomain.com – a fictive one used only locally).
# ping pdc.mydomain.com
Confirm Your Domain
Confirm Your Domain
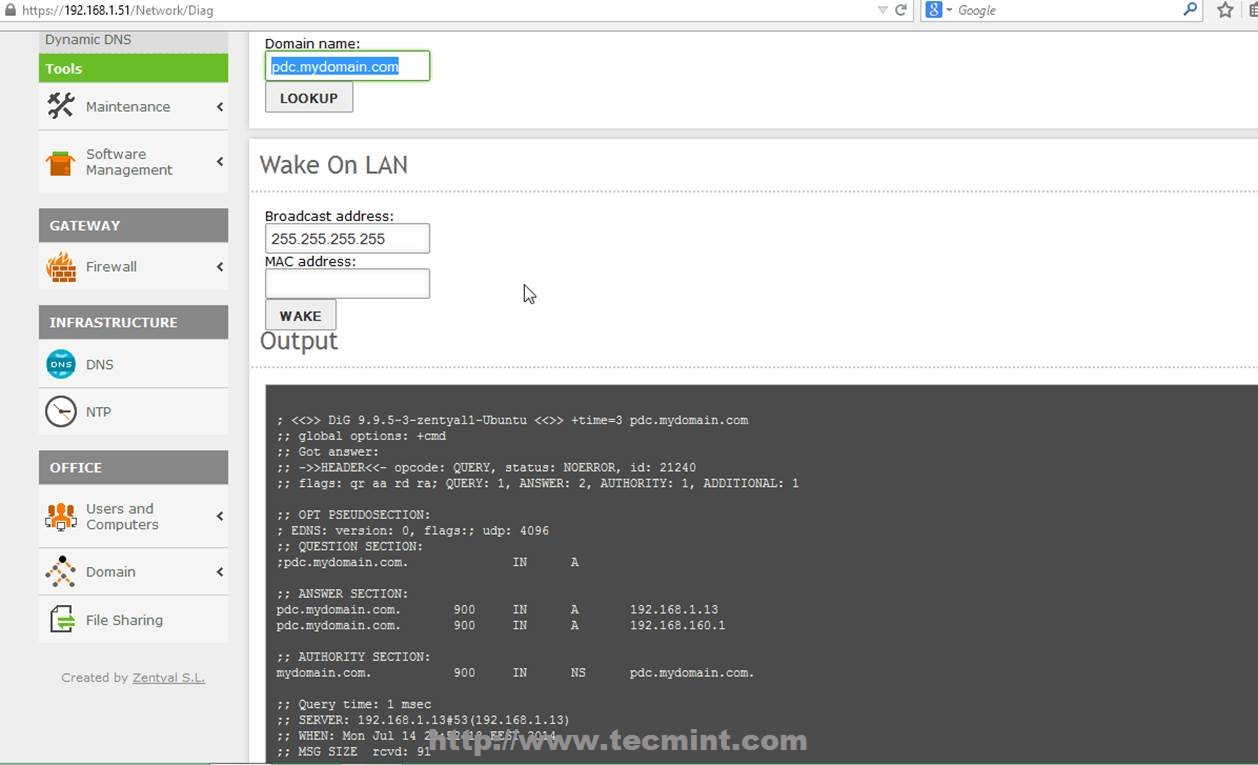
13. If you want to conduct other DNS test go to Zentyal Web Remote Admin Tool and use Pingand Lookup with your specific PDC FQDN domain name buttons from Network -> Tools Menuas presented on the below screenshots.
Network Diagnostic Tool
Verify Your Domain
Verify Your Domain
Verify Domain DNS Entries
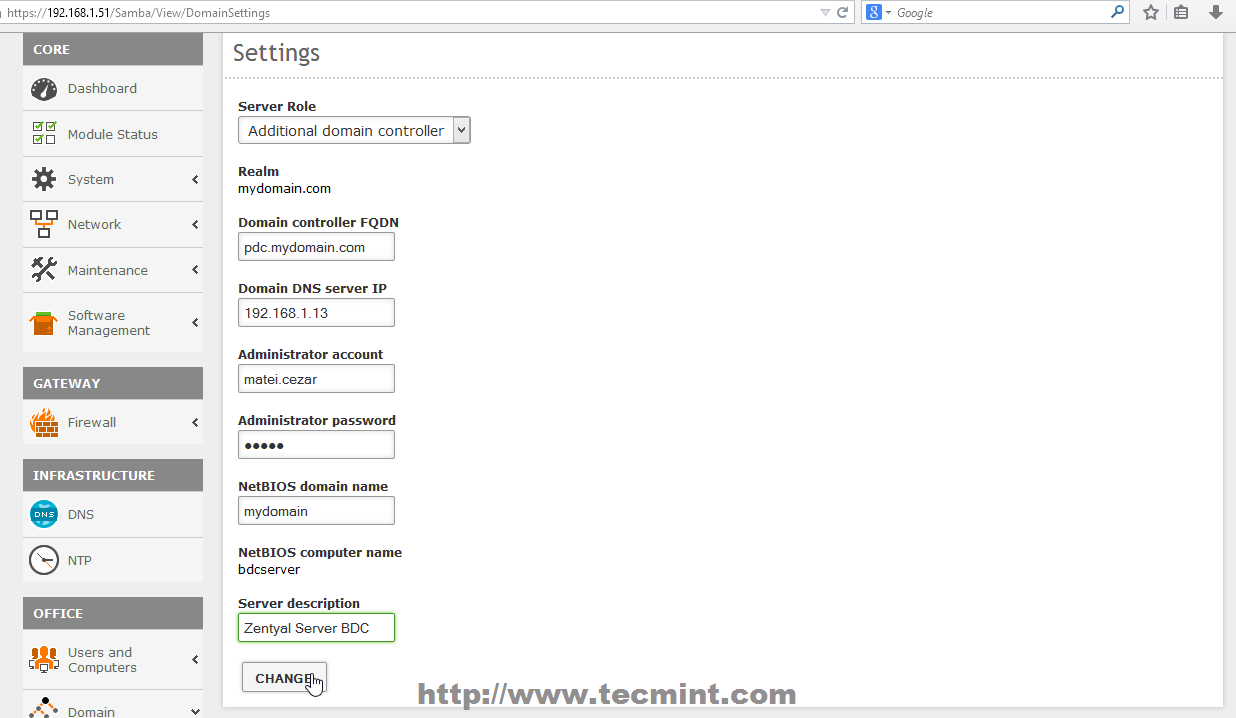
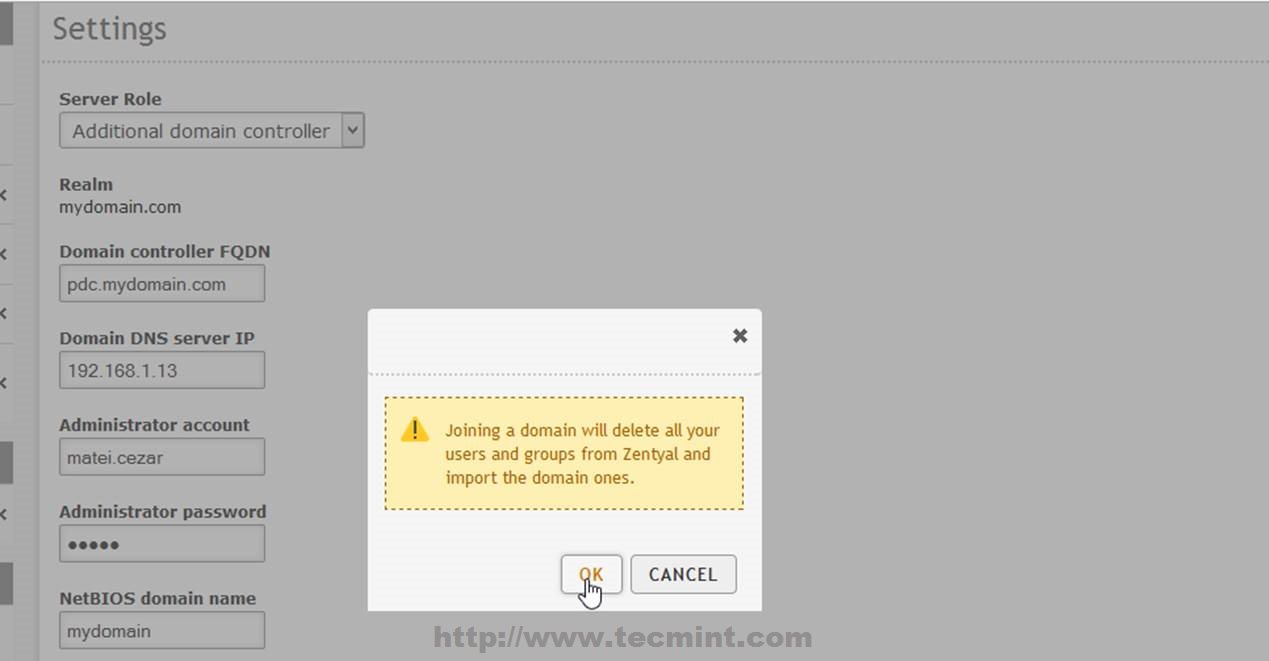
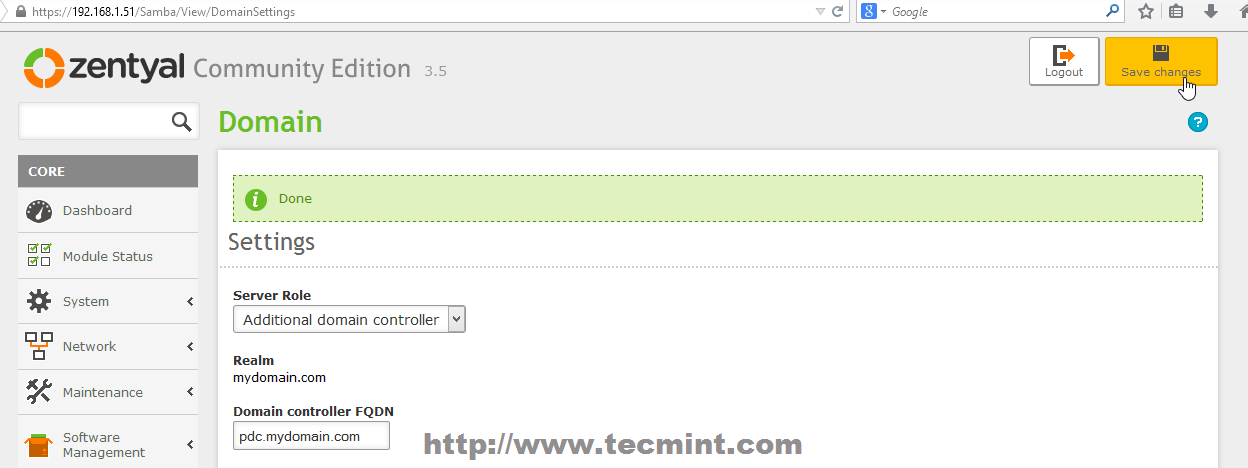
14. After the DNS test revealed that everything is correctly configured and functional move toDomain -> Settings left Menu and use the following Settings and after you finish hit onChange button and OK on Domain Join notification prompt, then upper Save Changes to apply configurations and stat importing User Accounts Database from your man PDC Server.
  1. Server Role = Additional Domain Controller.
  2. Domain Controller FQDN = your Primary Domain Controller FQDN.
  3. Domain DNS Server IP = your Primary Domain Controller IP Address or DNS responsible with PDC resolutions.
  4. Administrator Account = your Primary Domain Controller Administrator User.
  5. Administrator Password = your Primary Domain Controller Administrator User password.
  6. NetBIOS Domain Name = choose a domain name for NetBIOS – it can be your main domain name.
  7. Server Description = Choose a descriptive name that defines your BDC server.
Enter Domain Settings
Confirmation to Join Domain
Save Domain Changes
Save Domain Changes
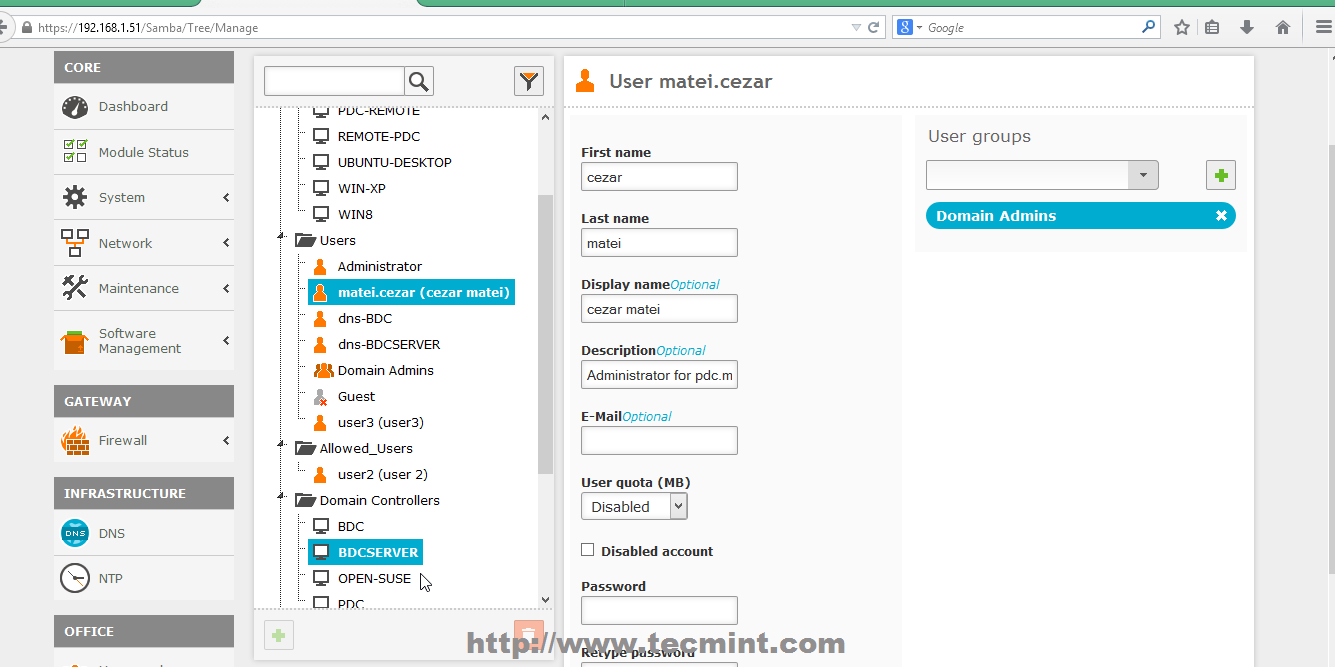
15. That’s it! Depending on your database size the replication process can take a while, and after it finishes you can go to Users and Computers -> Manage and you should see the entire Users and Computers database from PDC completely synchronized with your Zentyal 3.5 BDC Server. Use klist command to see your domain Administrator Users.
Users and Computers Database
$ klist
Check Domain Administrator Users
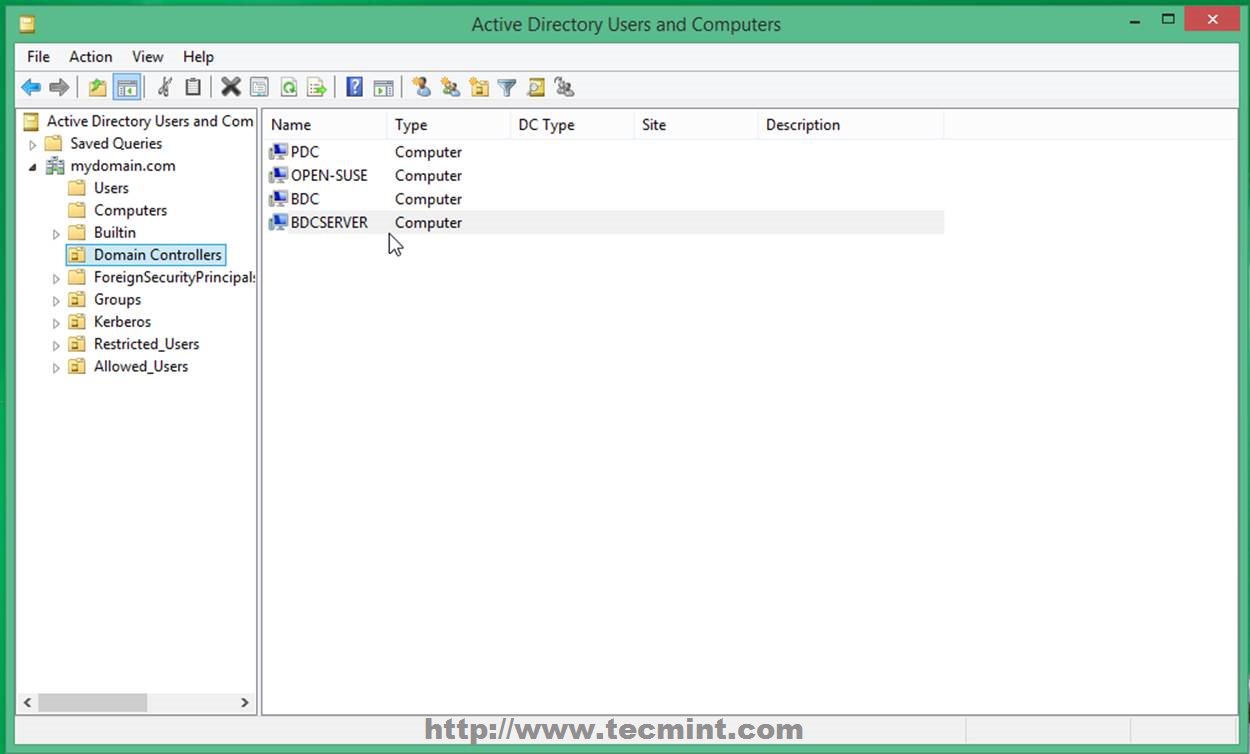
16. You can also check your Zentyal 3.5 BDC from a Windows based system if you have installed RSAT (Remote Server Administration Tools) by opening Active Directory Users and Computers -> Domain Controllers.
Verify Zentyal from Windows
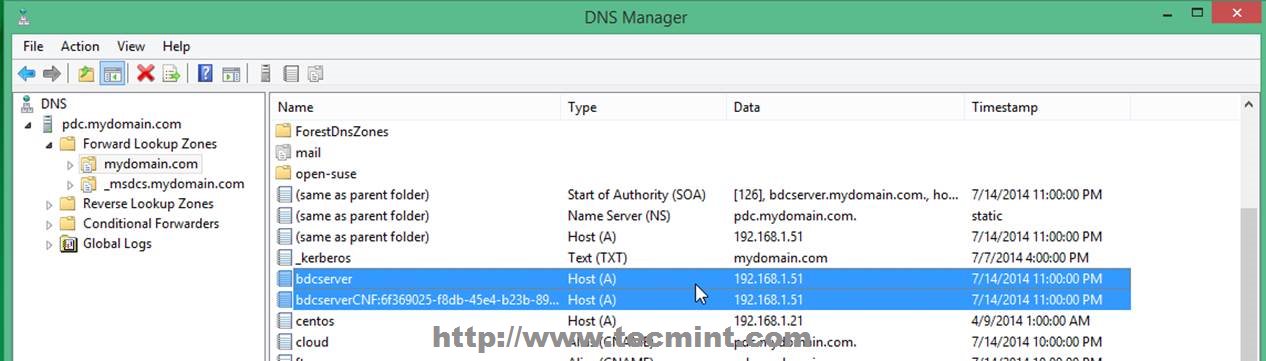
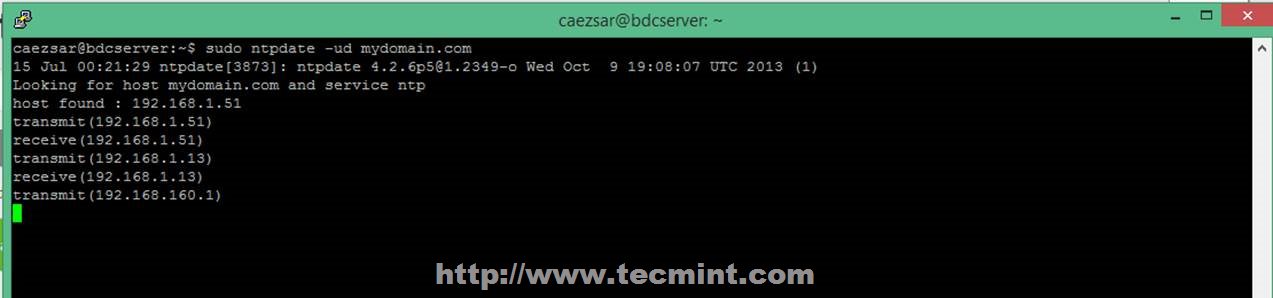
17. As the last checks and setting you can open DNS Manager and see that a new DNS A entry has been added with your BDC Server Hostname using its IP Address. Also make sure that you open a SSH connection to your Zentyal BDC Server with Putty and sync time on both Domain Controllers using ntpdate command.
$ sudo ntpdate -ud domain.tld
Confirm New DNS Entries
Sync Time on Domain Controller
Zentyal Linux 3.5 Community Edition Server with Samba4 can fully participate in Active Directory, and once configured as a part of the domain you can use RSAT Active Directory tools from a remote location and switch FSMO roles to the AD servers on your network.